
Segment Management Dashboard
The Segment Management dashboard helps you understand the details about each segment, and create and edit segments. For a detailed list of segment definitions, see Audience Segments.
-
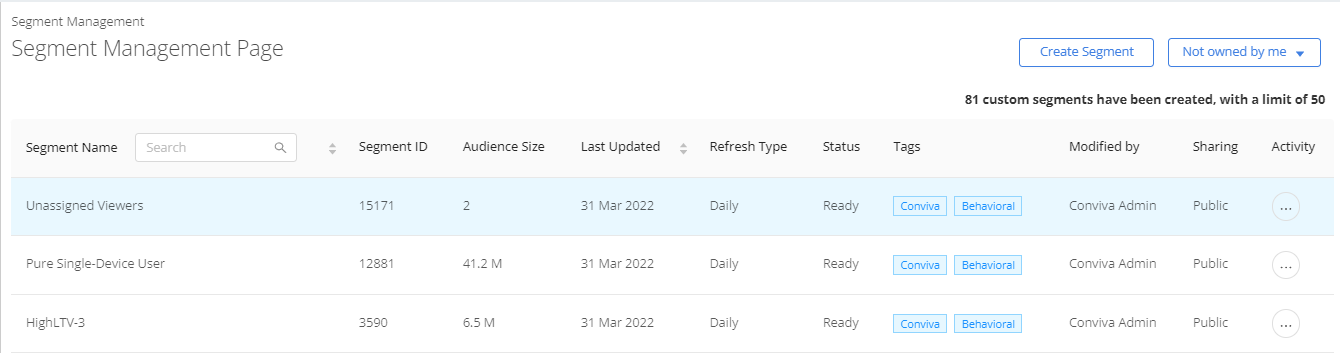
Click Segment Management to display the current segments. The Segment List page appears with a list of current segments and segment settings.
Refresh Type indicates that the specified time range is a rolling time range that refreshes daily, or a one-time range that computes once when the segment is created.
Use the Owned by me drop-down to filter segments created by you and other users.
-
Click the kebab icon to view segment options.
-
View Summary displays a summary of the segment settings.
- Edit opens the segment page for quick updates.
-
Go to Segment opens that segment page.
-
Share provides options for restricting segment access to individual sharing, private to you only (and your admin), or public access to all users. By default, segments are private.
- Delete the segment. Only the segment owner or admin can edit and delete a segment.
-
User segment permissions can be set in the Pulse user page.
- Only admins can make segment public.
Note:
-
-
Click a segment name to display the segment details, including the filter settings, viewing metrics, and other segment performance data. Use this data to determine the best segment configuration settings.
-
Click the Filter bar to view and modify the filter settings applied to the segment.
-
Click Create Segment.
Creating a Segment
Segments are collections of viewers that are based on viewing behaviors to help you analyze viewership. For more information, see Audience Segments.
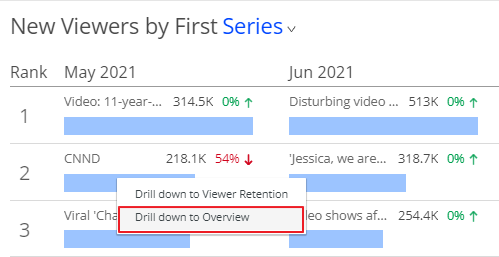
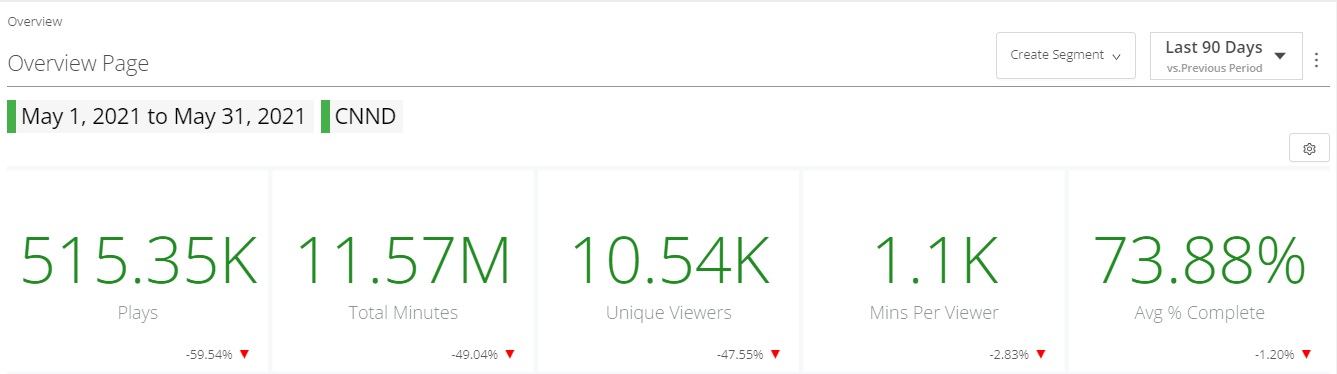
You can create a segment from any page of Audience except from the Viewer Acquisition and Viewer Retention pages. However, you can drill-down to the Overview page from the widgets in the Viewer Acquisition page, and then save the filter set as a segment. This new segment contains the analytical data based on the context and filters that you selected on the Viewer Acquisition page. For more information, see Performing Drill-down Analysis.
-
On any widget on the Viewer Acquisition page, click the data point or cohort for which you want to create a segment, and then drill-down to the Overview page.
-
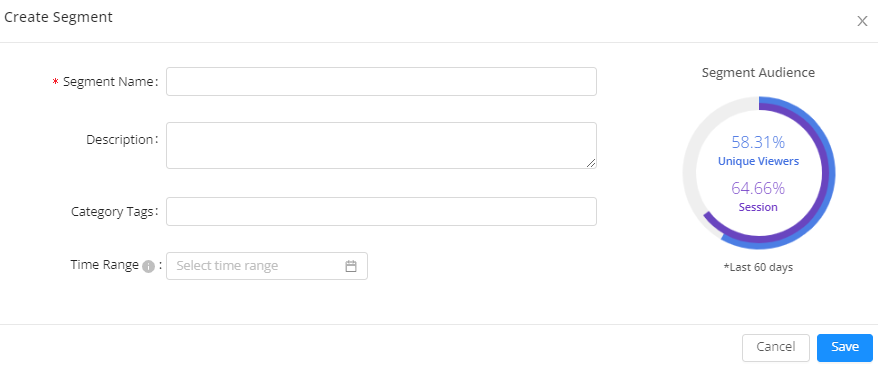
To build a segment from any other pages,click Create Segment in upper right menu. You can also create segments based on the current filter settings. Update the filter settings and then click Save filter as a segment.
-
Enter the values for the desired fields.
The Segment Audience defines the percent of unique viewers and the percent of total sessions in a given period selected based on the segment settings.
-
Use the segment option tabs to create the segment selection expression. Segment options between and within tabs use logical AND. Multiple attributes for the same option, use logical OR.
-
Content
-
Consumption
Attributes -
Custom
Tags -
Behavior
-
Ads
-
Ad Impact
-
Segment
-
Demographics
-
First
Stream
-
-
Click Save to create the segment.
The segment is created and listed in the Segment Management page. For segment analysis, see Segment Overview. For advanced segment options, see Complex Segments.
Note: The same settings are displayed when editing a segment.
See Audience Segments for a reference to the Conviva defined behavior segments and attributes.
Copying an Existing Segment
If you want to create a new segment which is similar with an existing one, you can copy the existing segment and edit the segment based on your requirements. You can save your time in this way.
-
Open Segment Management Page and locate an existing segment that you want to create a new segment based on.
-
Click the kebab icon under Activity and select Copy.
-
In the Copy Segment window, modify the segment based on your requirements.
-
Click OK.