
The Conviva Metadata Service (MDS) provides metadata services, such as coverage reporting and transformation rules, for the metadata displayed in Audience.
Use MDS to view metadata quality reports across the players in a c3 account and enable transformation rules to normalize metadata discrepancies.
Coverage Reports
The Metadata Coverage or Quality Report V2 (internally called pre-MDS report) is for:
Integration engineers or QE to identify gaps in sensor integrations that pass metadata from the players to the Conviva sensor.
SC teams to identify metadata gaps or integration issues and create plans/proposals to update integration by priority across players.
SC teams to review metadata required by an c3 and fix gaps with normalization rules in MDS- Rule Engine.
Coverage reports use a customize percentage threshold to displayed a color-coded status to indicate the percent of metadata use across sessions.
MDS Rule Engine
The MDS rule engine enables rules for transforming metadata that appear in Audience:
Direct mapping rule for new and changed names
Regex rules to map new metadata based on regular expressions, such as ...
Fallback values to apply alternative names to metadata during fallback conditions.
Rules based on spacing
Advance DSL rules
These rules transform the displayed metadata in Audience based on the rule settings.
DryRun Account Validation
After changes are complete but before going to production, push them to c3.DryRun, to create and manage a review report.
Getting Started
Using MDS starts with getting permissions from the Support team in Portal and configuring the metadata service on the c3 account. Additional MDS user access is also enabled.
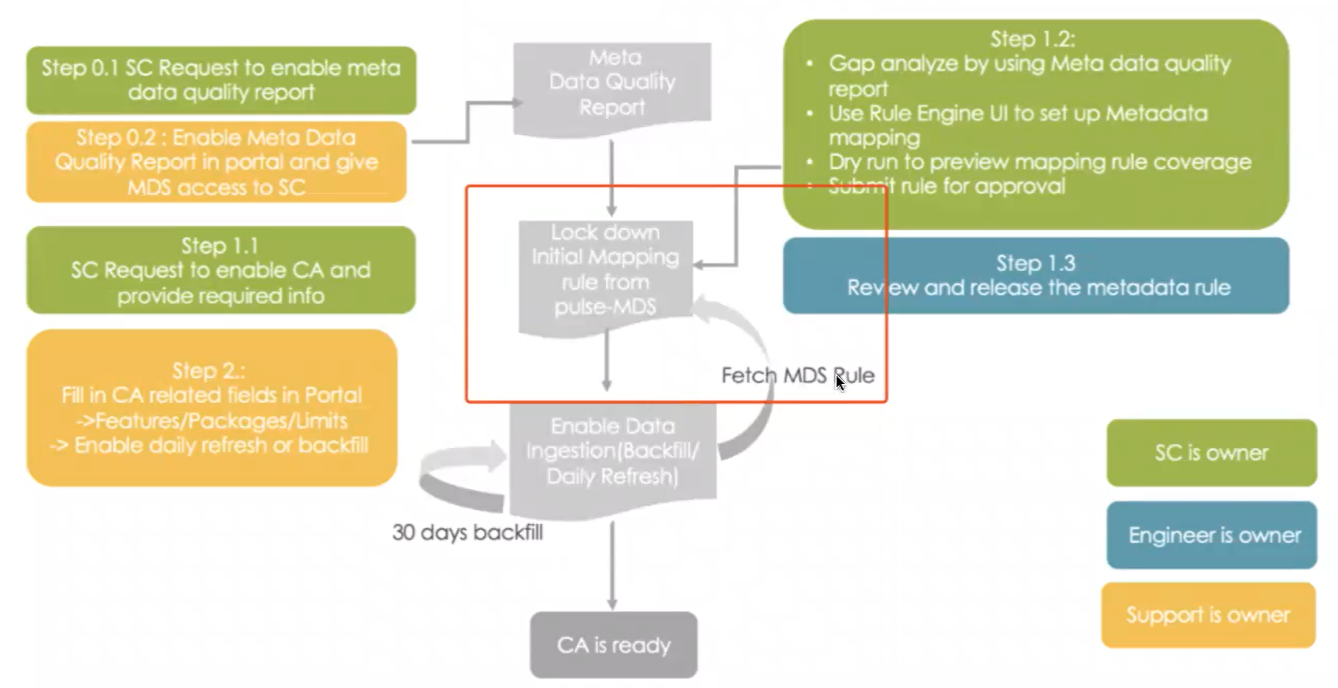
v2 (are both v1 and v2 supported now?)
Enable Metadata Report Access
Submit a ticket to support@conviva.com requesting Metadata Quality Report access.
Support configures Portal access to Metadata Quality Report.
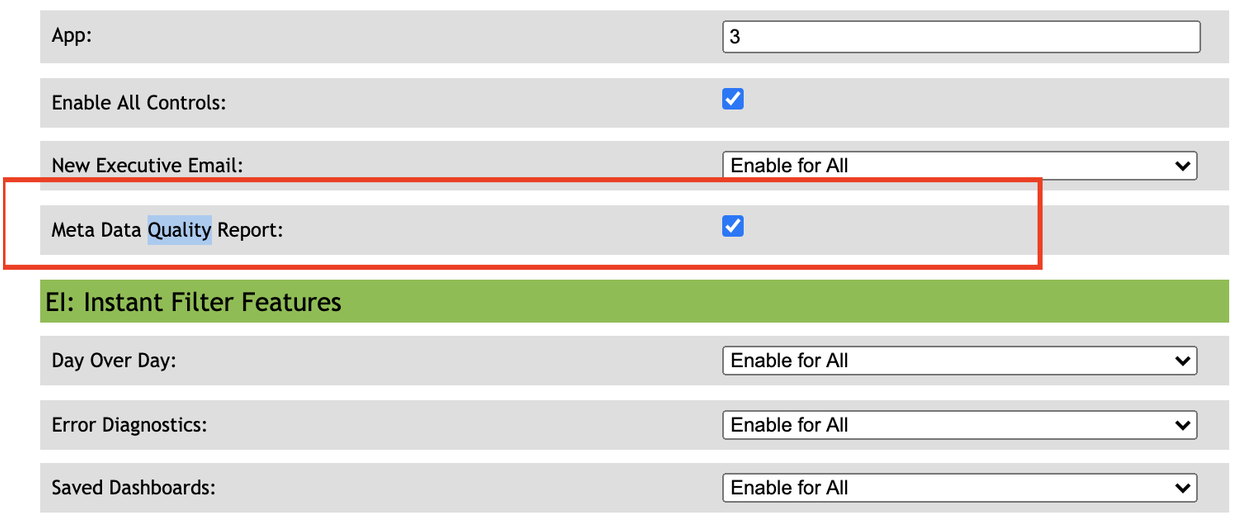
In the Customer Tab enable the Meta Data Quality Report and commit the transaction. MDS receives fresh data in the next day and then updates on daily basis.
The first time the report is available from Portal, data may show up within 2 days, depending on when the Portal transaction is submitted-- before/after daily update window. The timezone for data processing is set to UTC-8.
Also, go to User Management in Portal to give MDS access to the required users.
Metadata Coverage Reports
In the Pulse App menu, click All Products and select Metadata Service.
The Metadata Service page appears with tabs for Coverage, Rules Engine and Version Control.
Coverage data appears by default.
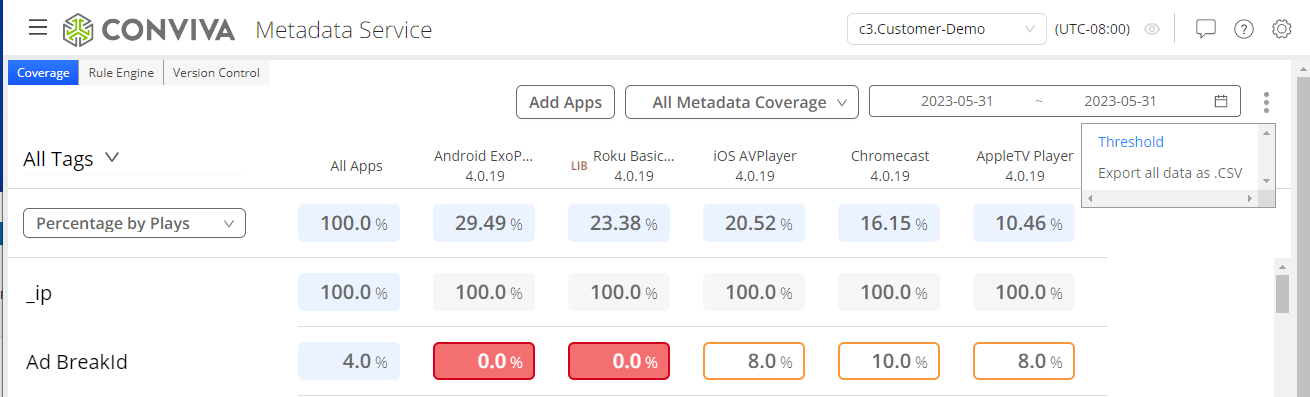
In the kebab, select Threshold to select the percent coverage applied to color-codes statusin the content table. Default is 80% so if 80% of the sessions successfully returned the metadata values, the coverage appears as green for those metadata cells. If less percent of the metadata values were returned, the coverage appears as another color, red or gray) for those metadata cells.
Customizing Tag and App Display
The Coverage tab displays metadata tag/dimension utilization across players based on the set threshold.
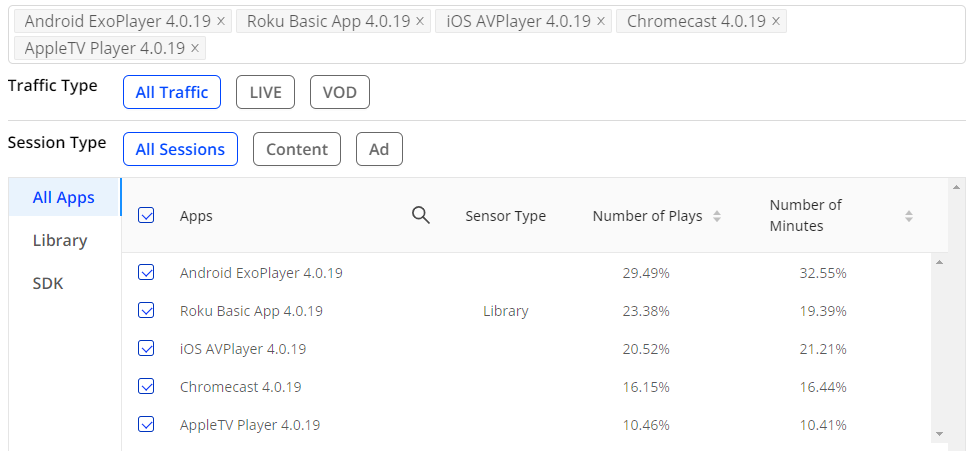
The first row of the table shows the top 10 impacted Apps sorted by % of Plays in descending order. Data can also be displayed by % of Time Watched. Click Add Apps* to customize the app displayed.

Metadata by Tag Type
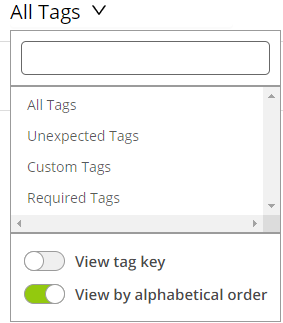
From the All Tags drop-down, you can filter the displayed tags to limit the display.
Metadata by App, Traffic, and Session Type
From Add Apps, you can filter which apps are displayed.
Traffic Type (All Traffic/ LIVE/VOD)
Session Type (All Sessions/Content Playback Sessions/Ad Playback Sessions)
Sensor Type ( Library/ SDK)
Metadata by Sessions
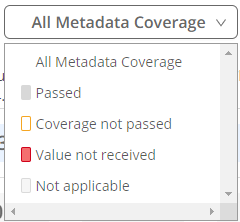
You can also filter the sessions for which metadata is displayed.
Passed: session coverage is greater than or equal to the threshold
Not Passed: session coverage less than threshold
Value not received: session coverage is 0
Not required: this tag is not required to pass value in integration side
Metadata Details
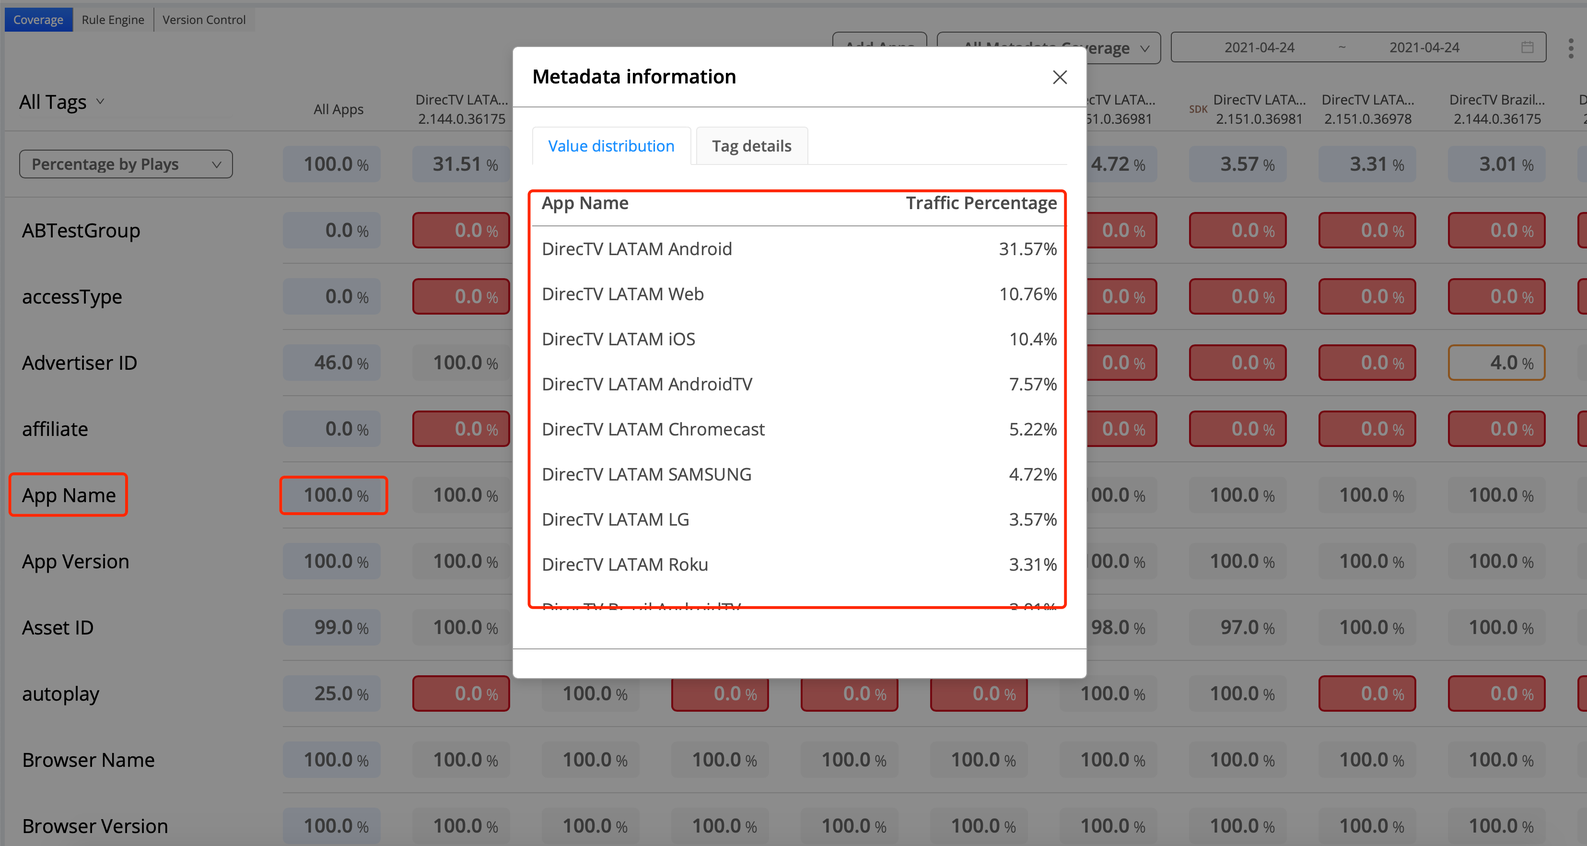
Click a tab, such as one in the All Apps column, to display metadata details, such as traffic distribution and tag name and coverage passed.
Rules Engine
The MDS Rule Engine enables users to customize the metadata passed by the Conviva sensor to the Conviva application. These customizations can enable the mapping of exiting metadata to new metadata based on:
Direct mapping of new names
Regex rules to map new metadata based on regular expressions, such as ...
Fallback values to apply alternative names during fallback conditions.
DSL based syntax rules
Typical use cases include changing the passed metadata name to a more readable name, transforming outdated names to new names, and trimming extra spaces after words.
The Rule Engine displays the currently passed Audience metadata in separate rows. along with the current mapping rules. Select a row to edit the mapping and applied rules.
MDS separates metadata into categories with different background colors or easy access:
Required Fields
Automated Fields
Custom Tags
Regex Match Rules
]
Use Audience Field Mapping Rules.
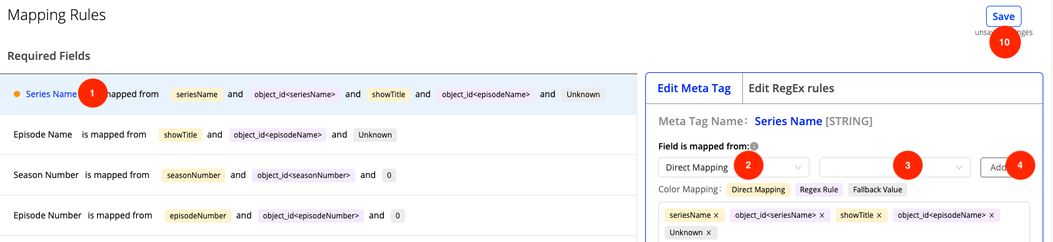
Click a metadata tag required by Audience from the tag list (i.e. Series Name)
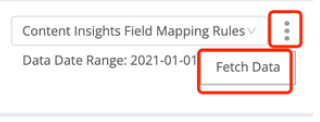
Go to the “Edit Meta Tag” panel on the right, choose a type of mapping from the dropdown list. (i.e. Direct Mapping/Regex Rule/Fallback Value) If you are not able to find custom tags, but you can confirm the custom tag in the MDS coverage report. please click fetch data in the right corner and fetch the latest one-day data accordingly. For newly added custom tags we need to update our tags by trigger fetch the latest data.
Type to search for the tag you want to map to “Series Name”.
Click the “Add” button to add the selected tag as a label in the below box. You can repeat steps 2 - 4 to add multiple rules and tags( as indicated in the below image), and you can adjust orders by dragging the labels with a different color to sort by priority

Invalid values are not case-sensitive. The matched value will be converted to 'Fallback Value'. If there are values that are not case- sensitive in product business, you can configure them in invalid values.
If you want to optimize valid values, you can use [Transform these fields by direct mapping] or [Transform these fields by regex rule] function. If the original value matches the setting in [Transform these fields by direct mapping], it will set to the new value.
If the original value matches the regex rule in [Transform these fields by direct mapping], it will be set to the new value.
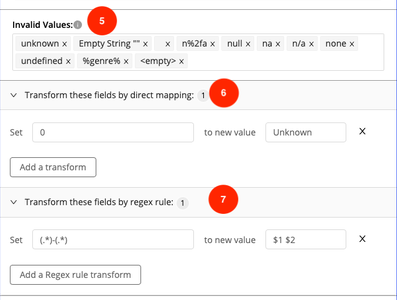
Note: The [Transform these fields by direct mapping] function is an advanced feature. If you want to use it, you can contact the MDS team to check or configure it for you.
Configure the [Trim extra space between words] function based on your requirements.
Configure the [Letter casing] function based on your requirements.
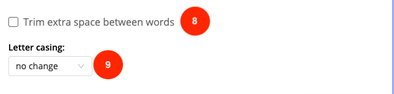
- Click the “Save” button on the top right corner to save all applied changes to the current version.

Custom Tags
Create custom tags to add additional data to VI dashboards.
- Click the Custom Tags rule and click Create New One.
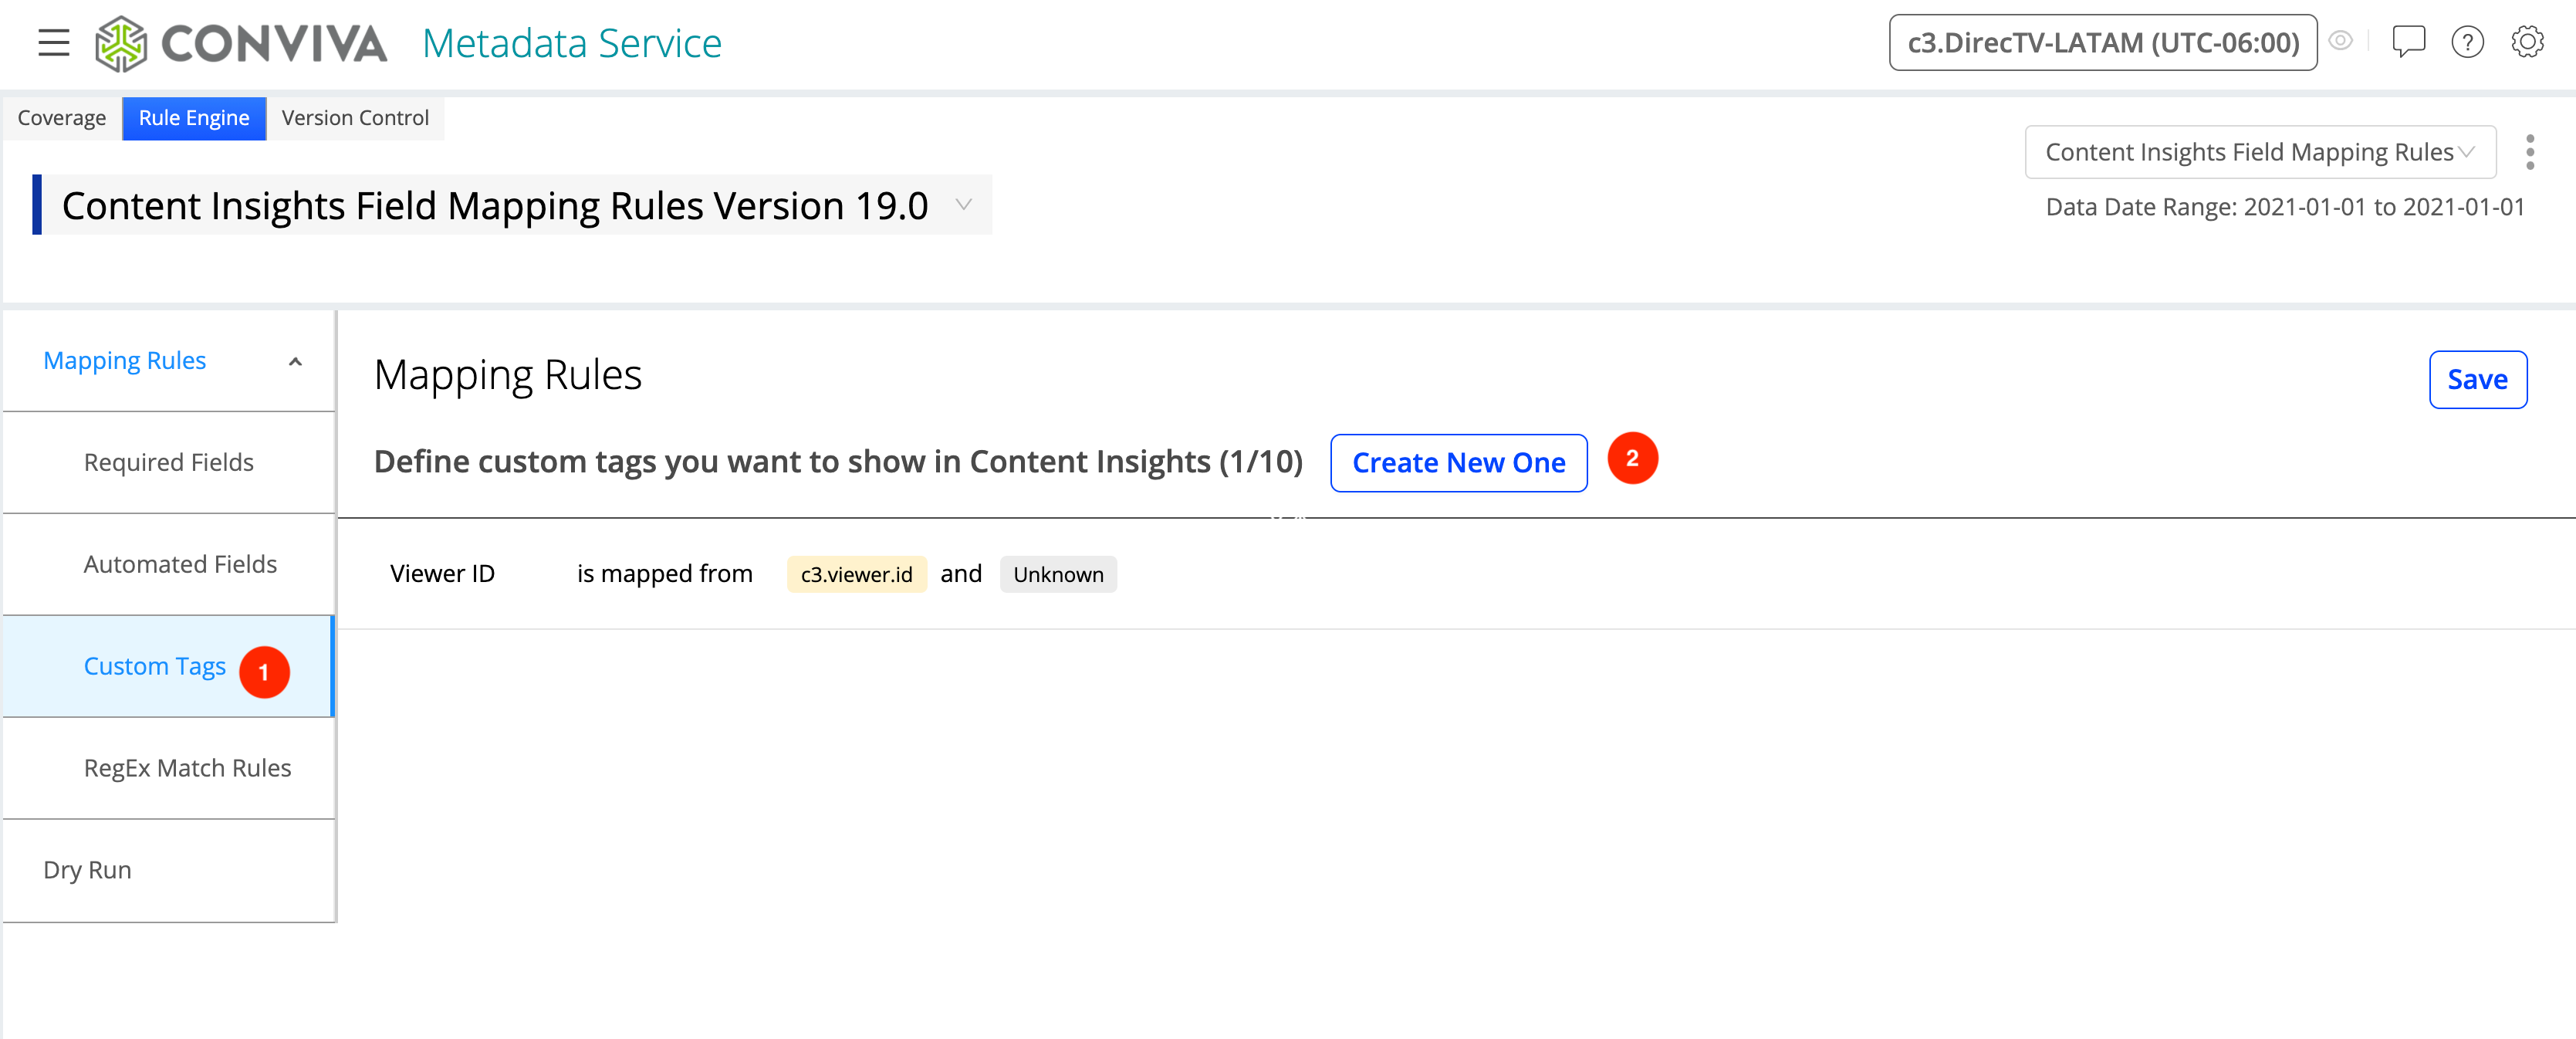
Navigate to the “Custom Tags” tab, click “Create New One“ then pop up the “Create Custom Tag“ window.**
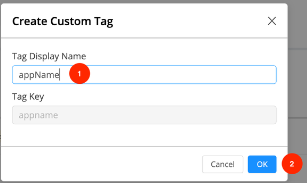
On the “Create Custom Tag“ window, input the Tag Display Name and the Tag Key will be auto-generated, then click “OK“, the Custom Tag is created successfully.
Click to select tags from the list within the limits configured in Portal. Then selected tags will show up in the list.
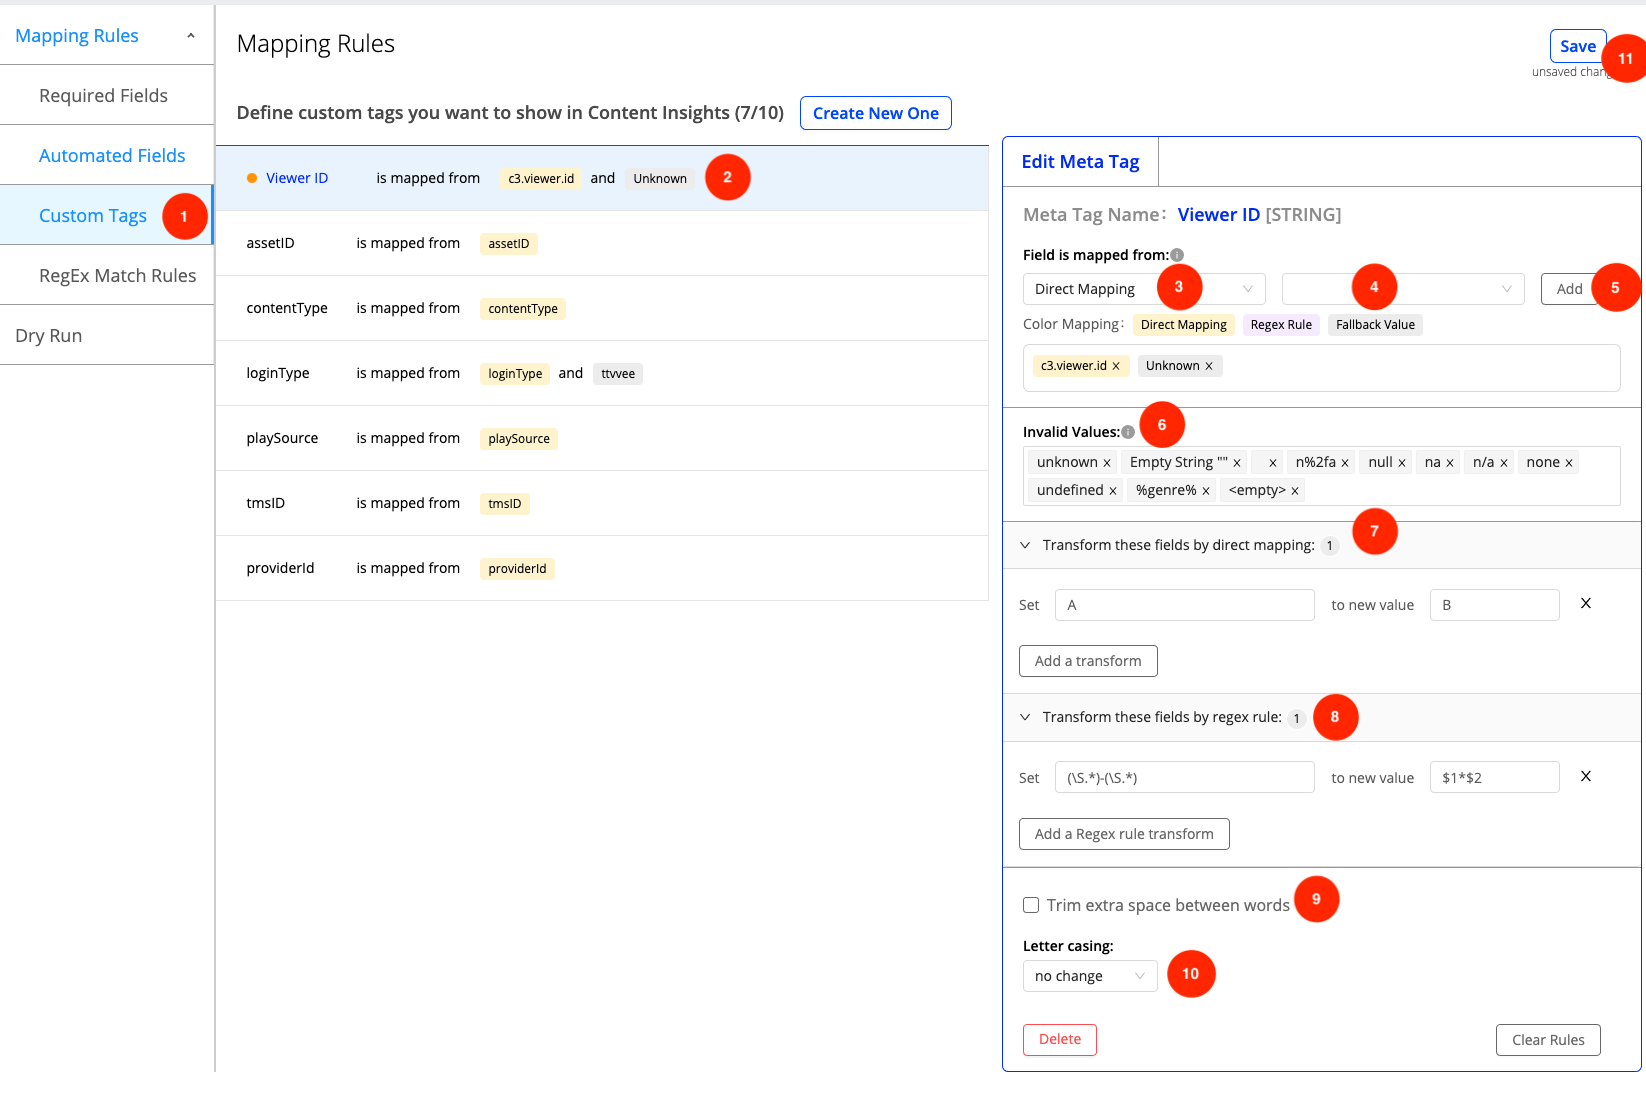 Repeat steps to apply rules for each custom tagIf you want to delete the custom tag, you can click the [Delete] button.
- Click “Save” to update the current version with all applied changes.
Add Regex Rules to Clean Up Metadata
If the metadata tag is not clean/consistent and needs parsing the strings to get values, you can use the regex rule to clean up the metadata.
In advanced mode, user can write DSL manually to extract metadata.
Click to select a target tag from the tag list
Choose “Regex Rule” in the “Edit” panel
Select source tag to parse (i.e. object_id)
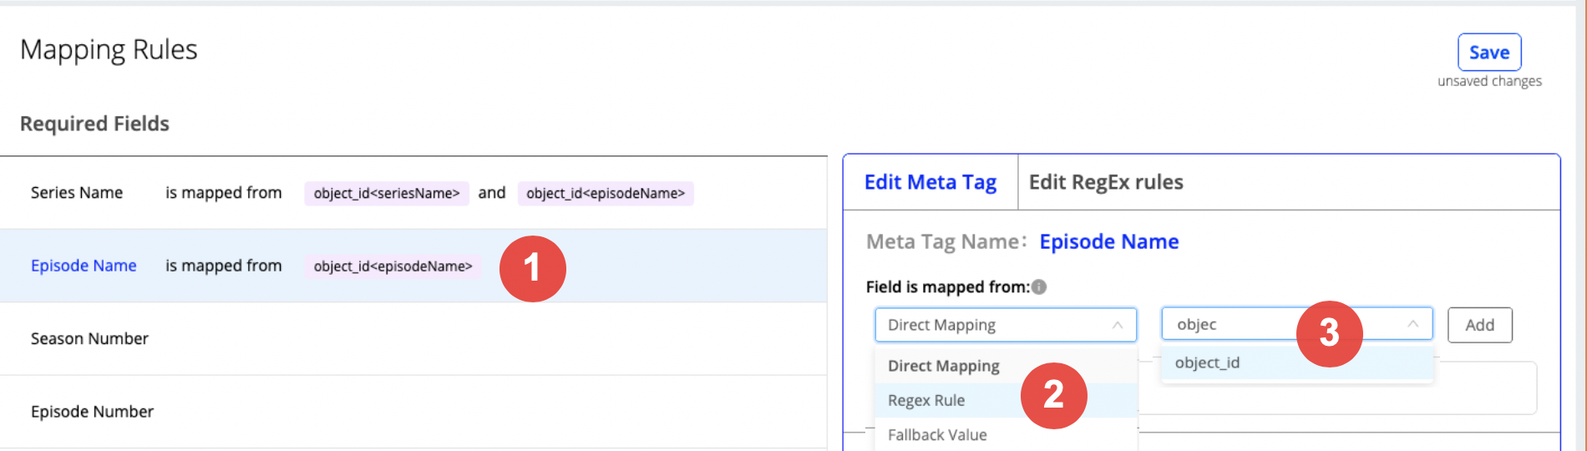
Type the group name you will use in the regex rule
Click Add to add the selected tag as a label ( Purple indicate the mapping type is Regex Rule). full path key of tags.
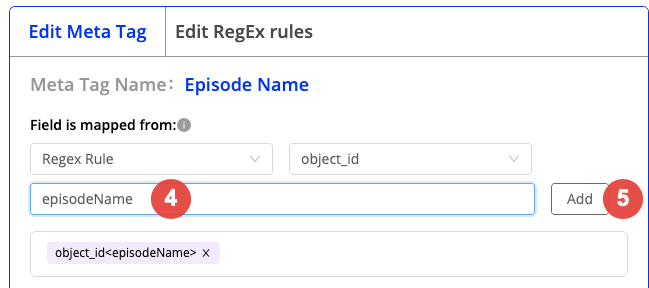
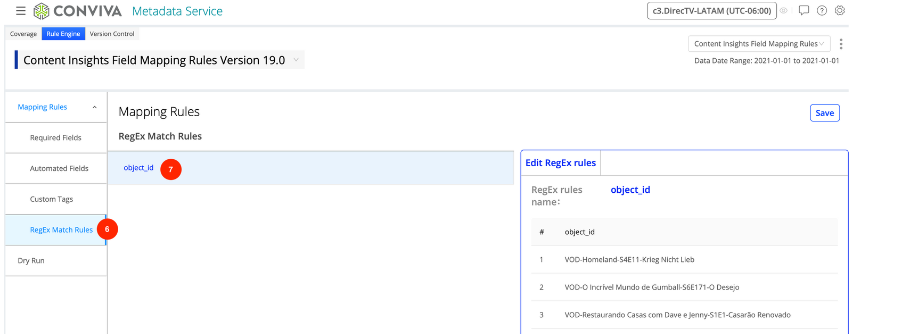
Navigate to the tab of “Regex Match Rule”
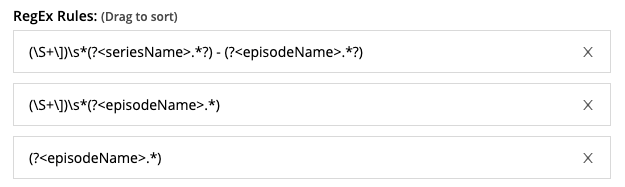
Observe patterns( i.e. [XXX] SeriesName - EpisodeName) from the sample values in the right panel and type the regex rules.
Copy and paste a string from the sample values.
Click Run test to verify the parsing result.
Click Add Rule button if the testing result looks good. Repeat steps 7-10 if multiple rules are needed. You can also drag each rule to sort by priority.
DryRun Validation
After configuring the mapping rules, access c3.DryRun to validate the metadata changes.
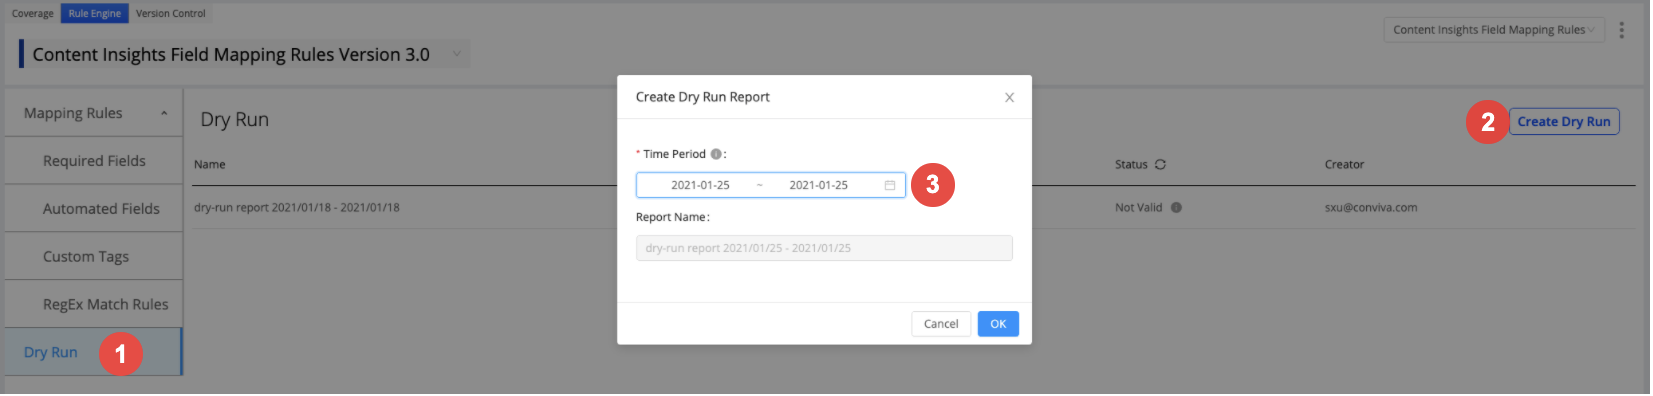
Switch to the version you want to perform Dry Run on, then navigate to the Dry Run tab
Click Create Dry Run
Suggest select 1-day data to get a simulated result of applying the rules on production data. It takes 30 mins to hours to get the report depending on data volume. Note: There is a “Refresh” button next to the Status column to update the Dry Run Status. ( pending/success…)
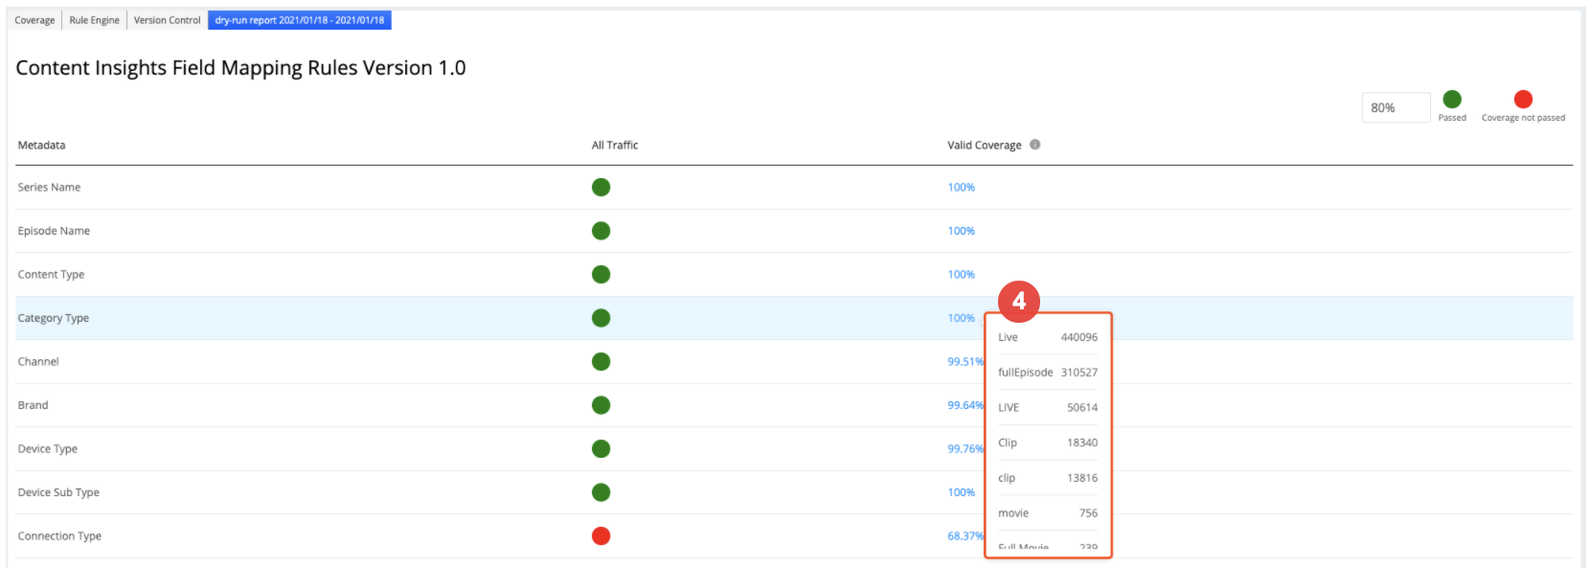
- Open the Dry Run report to check the overall coverage and values after applying the rules.
- Select a version to check the workflow

- The version status step will change to green color once there is a valid Dry Run report for the current version.
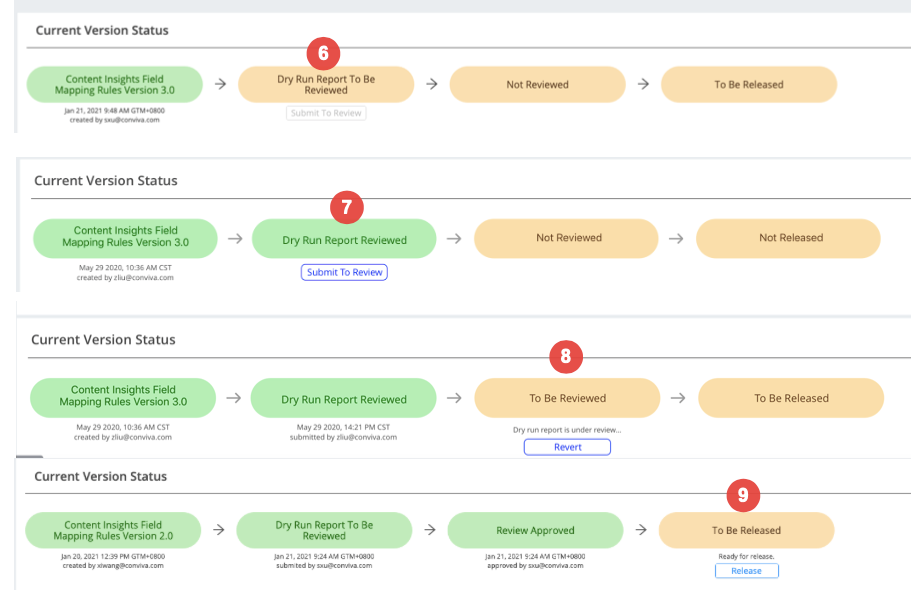
- Click the button Submit to Review, and add any rule submitter besides the default submitter. Then it will reach out MDS team to review the rules, especially when regex rules are included. (This step could be skipped in the future.)
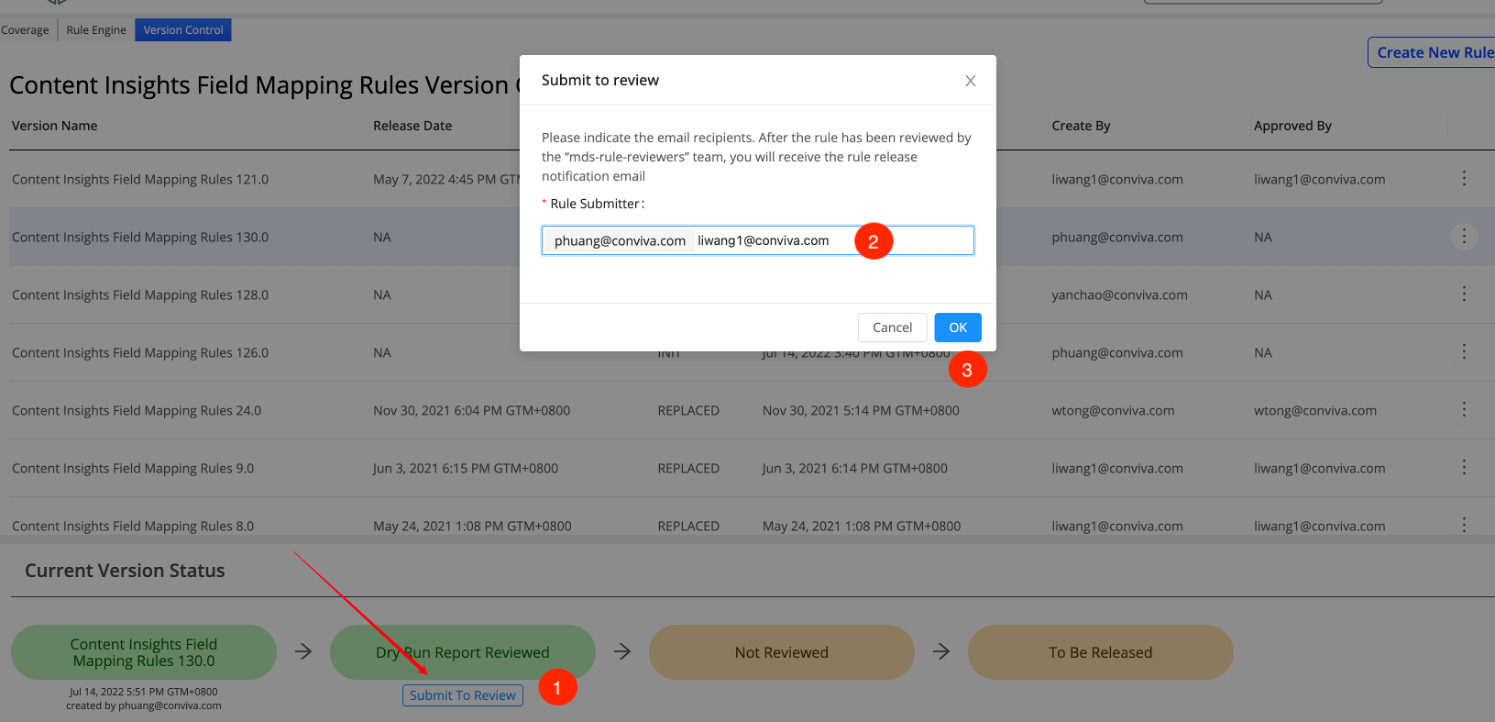
Reviewer can Approve or Revert the rules The MDS team member have the right to moderate and release rules to production.
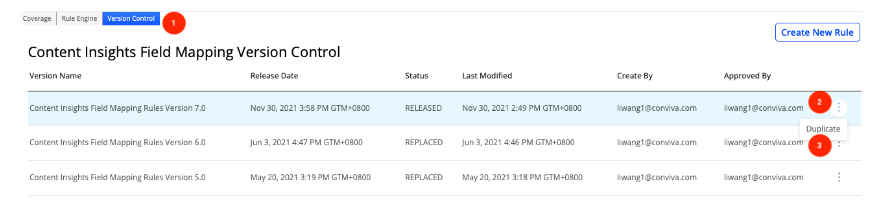
- Please note once you release the rule file to production, it is non-editable anymore as we want to keep snapshots for troubleshooting. If you want to make changes to the production rule, you should go to the Version Control tab, click the kabab icon next to your target version, click duplicate to make changes on the duplicated version then release it when comfortable.
- Perform a SMALL backload of about 3 days to check your work in VI before performing any further backloading or starting ongoing data ingestion.