
Prerequisites
-
Obtain your account's CUSTOMER_KEYs.
Conviva provides a test account and a production account for Test and Production environments, respectively. You can find your CUSTOMER_KEY here: Pulse - Account Info. Ask your Conviva representative for assistance if you have problems accessing it.
-
Pass the gatewayUrl parameter to init() method of Conviva SDK. The gatewayUrl is specific for your account and shall ONLY be used for tests, never for production deployment.
Sample gatewayUrl for Testing:
https://<customer_key>.ts-testonly.conviva.com
IMPORTANT: If there's any doubt on how to set the gateway URL, consult your Conviva representative - this is a critical parameter. For production, Conviva library uses the automatically-assigned gatewayUrl.
Use Touchstone 2.0 in Pulse to perform self-validation and debugging of video sensor integration
-
For Conviva JavaScript Sensor Integration, you can use any custom gateway URL with a proxy service setup. This is applicable for JavaScript version 4.7.13 onwards.
-
Plan your metadata
Conviva supports Pre-defined, Device, and Custom metadata. Work with your project team to determine the need to collect any custom metadata. It's also recommended to work with your Conviva representative to create your metadata plan prior to integration.
Sample Application
The sample application illustrating Conviva integration example for ExoPlayer can be found here.
Conviva Integration Assistant Plugin
Conviva provides the Integration Assistant plugin to integrate stream sensors with Android players, which involves fewer manual steps. You can use the plugin for faster integration with Gradle dependency syncs and a generated Java Helper class.
This page helps you install the plugin and integrate the Android players.
Downloading and Installing the Plugin
Download the plugin, ConvivaPlugin-SNAPSHOT.zip.
Open Android Studio on your computer.
*1. To install the plugin, close all the files on Android studio, and drop the zip file from the downloaded folder to the file area in the Android Studio. You can also open the file from Files->Preferences/Settings->Plugin->Install Plugin from Disk...
*
- Click Restart when the studio prompts for a restart.
*1. The plugin gets installed with this restart. You can add the plugin to the sidebar from the _Tools_menu.
*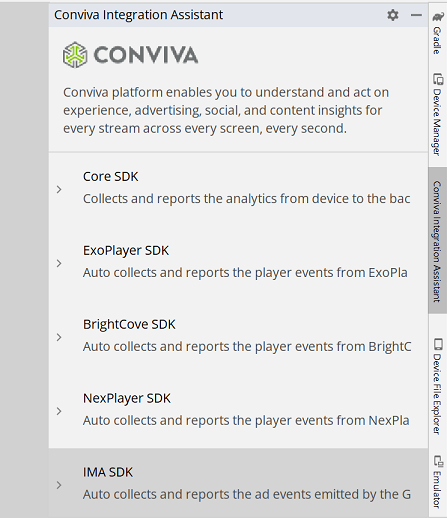
- Choose the SDK to integrate. The plugin supports Core SDK, ExoPlayer, BrightCove, NexPlayer, and IMA modules.
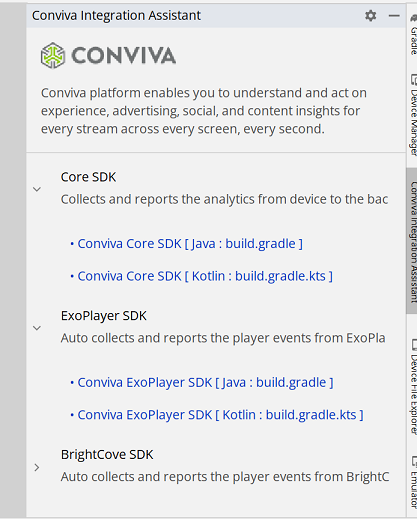
- To install the Core SDK library, click _Integrate the_ConvivaCore SDK and choose the SDK version. If you choose the ExoPlayer SDK , then the click Integrate the Conviva ExoPlayer SDK. This action starts the Gradle sync to add dependencies to your project.
*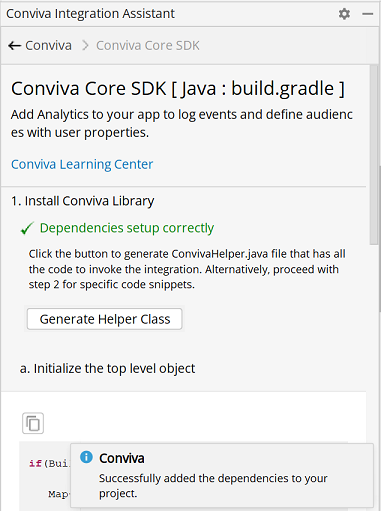
- Click Generate Helper Class and provide values for test and production customer keys, and validation URL. Choose a directory (usually, your project package) to save the helper class file. For example:
com.mypackage.MyExample.java
com.mypackage.ConvivaHelper.java
*1. This generates ConvivaHelper.java file with all the code snippets required for integration.
- Invoke the helper class methods from your package. For example:
ConvivaHelper convivaHelper = new ConvivaHelper();

//Builds and returns the ConvivaVideoAnalytics object.
convivaHelper.buildVideoAnalytics();

//Builds and returns the ConvivaAdAnalytics object.
convivaHelper.buildAdAnalytics();
- Advanced Use Cases are also available on the plugin for your reference.
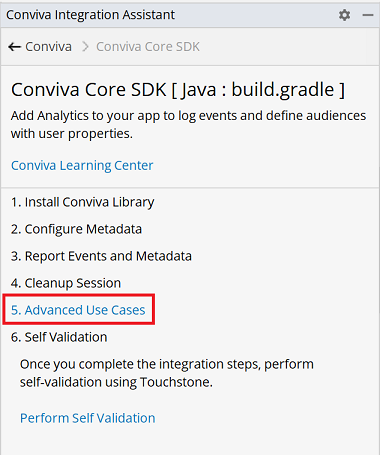
- The integration is complete; perform self validation using Touchstone.
Upgrade to the improved version of Touchstone. The older version of Touchstone has been deprecated.
Contact your account team (Project Manager/Integration Engineer) or Conviva Support (support@conviva.com) to start using Touchstone.
To learn more, see the Self Validation Using Touchstone topic.
Once you complete the integration steps, perform a self-validation and debug the video sensor integration using Touchstone.
For details about sensor integration, see Conviva Video Sensor Integration Steps
Touchstone monitors the activities of your integrated video application/player. You can see the list of devices, session status, and drill-down further to see the summary of session timeline, metrics, and custom metadata, and so on.
Review the following video guidelines in this slide deck to assist with the Touchstone 2 validation steps.
Performing Self-Validation
Perform the following steps for Self-Validation:
- Temporarily override the gateway URL parameter used in your integration code or
configuration scripts and point it to the value
https://*.testonly.conviva.com, where*is your Pulse account name. You can see your Touchstone service URL once you log in to Touchstone. - Log in to Touchstone and Pulse / Video.
- In Pulse, create a new real-time filter using your ASN or Client ID. This will allow filtering of the test traffic. The Client ID can be found in your Touchstone session.
- Start testing your integration using Touchstone. Follow the instructions and tutorials at Self-Validation Use Cases Videos.
- Follow the applicable test plans to execute the test cases using Touchstone and Pulse.
Commonly Failed Test Cases
Watch these videos to learn about some of the most commonly failed integration test cases. These videos provide a better understanding of the tools and the process of self-testing before submitting builds to Conviva.
Reporting of Successful |
Stream Failure at Startup |
Stream Failure During Playback |


Proxy Tool - Network Traffic Shaping Tool
The self-validation process is complete when you are able to successfully execute the test cases.
Submit for Conviva Validation
After the self-validation process is complete, submit your Device Application to Conviva QA for comprehensive validation testing through Application Manager and deployment. Conviva provides exhaustive testing of both metrics and metadata, establishing data integrity prior to launch. Comprehensive validation reports are shared upon completion for review, and additional support is provided by Integration Engineers in the event that issues are identified.
Conviva integration certification is mandatory before production deployment of your Device Application.
See the Build Submission for Conviva Validation section in Plan, Integrate, Validate, Launch Process for more details about Conviva Validation process.