
Introduction
Conviva VSI sensor integration involves passing events and metadata from video player applications to Conviva APIs to report viewer experience and performance data.
Conviva VSI integration begins with obtaining a CUSTOMER_KEY for your Conviva Pulse account.
Conviva provides two accounts: one for test, one for production. Respectively, two keys: for TEST and PRODUCTION environments. You can find your CUSTOMER_KEY here: Pulse - Account Info. Ask your Conviva representative for assistance if you have problems accessing it.
The diagram below illustrates the high-level architecture of Conviva VSI integration and your video application.

Conviva video sensors are implemented in a form of core SDKs, video player modules, ad modules and plugins, supporting wide range of platforms. For popular video players and ad frameworks, Conviva provides the modules or plugins to simplify integration. For the players which have no modules provided, implement Conviva sensor using core SDK APIs to report video / ad metrics and metadata explicitly.
Conviva VSI Sensor Integrations
Conviva VSI integrations leverage Conviva SDKs and player library APIs for optimized integrations for video stream events. The Conviva VSI supports the following platforms:
For installation, see the Conviva repo's at github.com/conviva.
Conviva VSI Sensor Integration Steps
This section outlines the steps to integrating with Conviva's Core SDKs and player library APIs. Variations are covered in specific player integration instructions. (Click the links at the bottom of the page for the platform-based instructions. Use the tabs within each platform page to view the instructions for each of the supported players.)
Install the library / add dependencies.
Initialize Conviva analytics using the CUSTOMER_KEY.
Set Device Metadata (check which fields are required for your platform / player since Conviva auto-detects certain values to make implementation easier).
Implement metadata and event reporting:
- Report playback attempt request along with metadata (content, workflow, audience, and other relevant metadata).
- Report video events OR pass player object reference to Conviva for auto-detection. Use the tabs within each platform page to view the specific supported player instructions.
- Report ad events (if applicable) or pass the ad object to Conviva for auto-detection.
- Report user actions (backgrounding, user dialogue, etc).
- Report end of playback.
Validate your integration using the tutorial here: Self-Validation Use Cases Videos.
Use Touchstone in Pulse to debug your implementation, if required.
Replace your TEST CUSTOMER_KEY with the PRODUCTION key and go live with your application.
Make sure the gatewayUrl for Touchstone is NOT used in Production!
- Done! Analyze your data in Pulse and improve your viewer experience - let's make video experience better!
Conviva monitoring shall be started immediately after the user initiates video playback, by either hitting "play" button, or in auto-play mode.
It shall be implemented using the following guidelines:
Only once per video playback attempt.
Before requesting and connecting to the video stream.
Before errors that could prevent playback might occur.
Before any DRM checks or other stream authentication logic.
Before playing ads.
Metadata Concepts
Conviva Metadata
Conviva categorizes metadata tags into three buckets:
Pre-defined tags that must be reported as part of contentInfo for all videos.
Device related tags that are automatically detected by Conviva backend and do not require integration updates.
Custom tags that are reported based on business requirements, specific to each customer.
Updating metadata or setting metadata late, after the monitoring of content has started, is subject to certain limitations. See the specific player instructions for details.
Metric Events
Conviva Metric Events
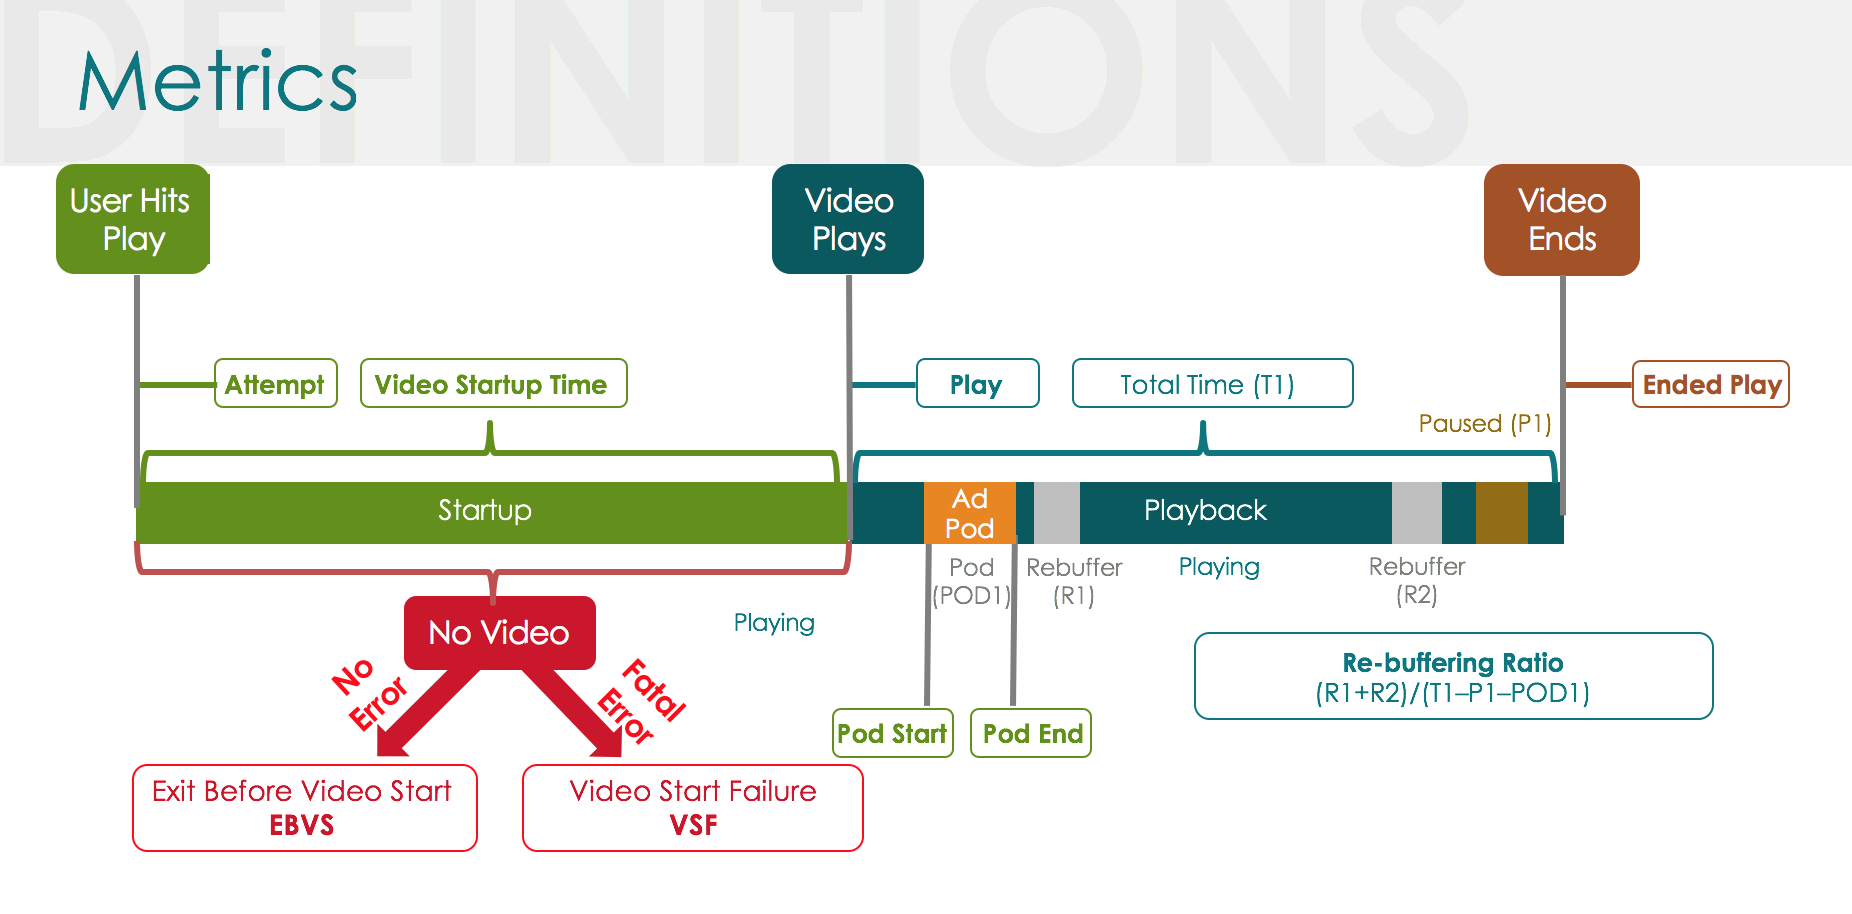
The exact Conviva monitoring session flow depends on many factors, including ads, DRM, and stream authentication usage. This diagram depicts the life cycle of a video stream, with the associated events, errors, and metrics reported by the Conviva platform.
The below diagrams depict the life cycle of client-side and server-side ad sessions, with the associated events, errors, and metrics reported by the Conviva platform.
Client-Side Ad Insertion (CSAI)
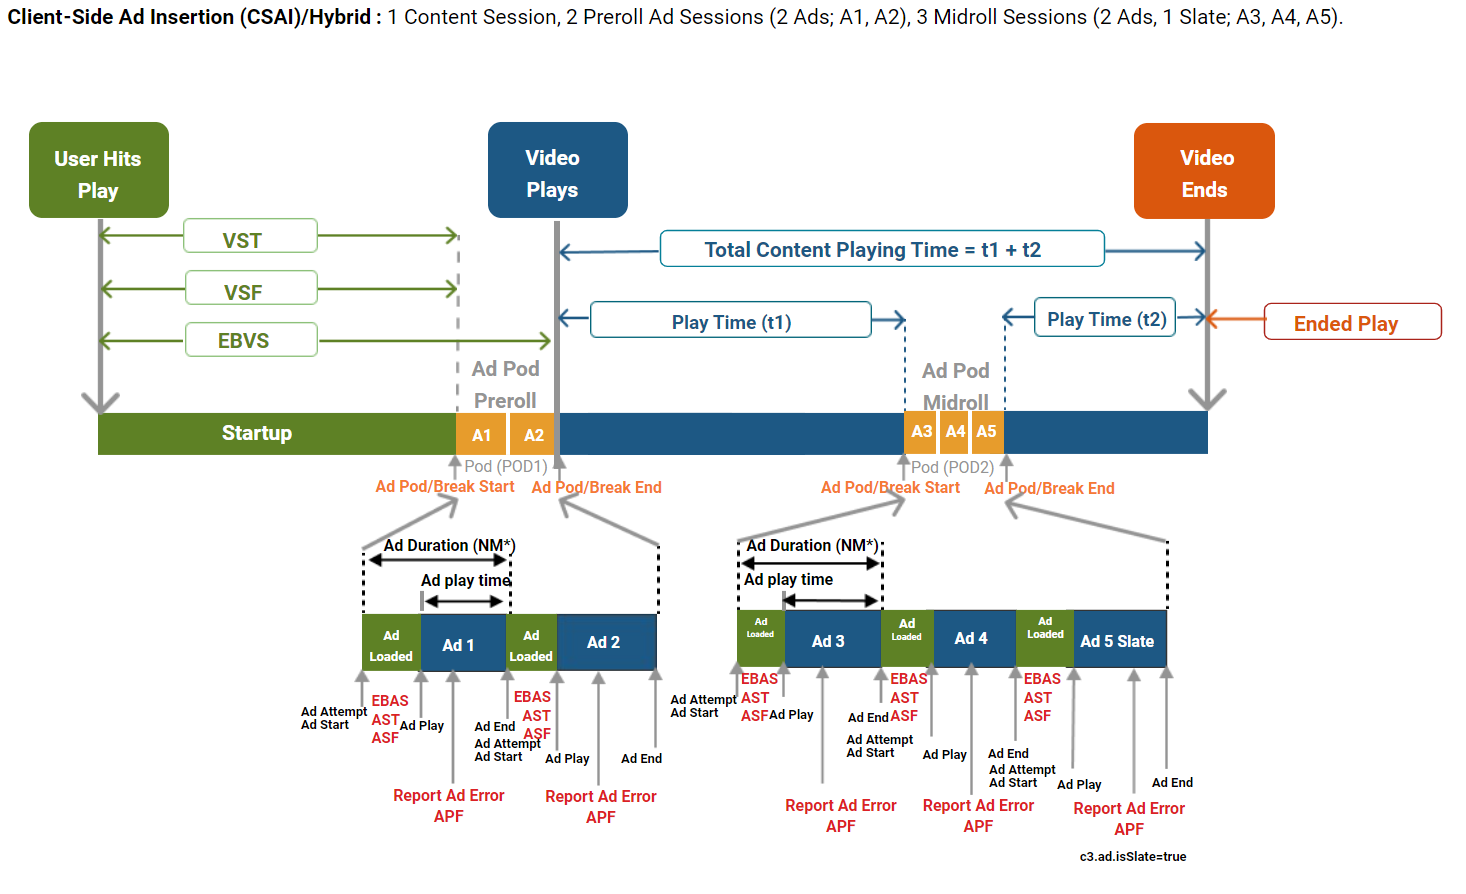
NM* - During the Non-monitoring state, while the ad plays, the main video is not tracked. However, the ad metrics are tracked in Ads and reported in Pulse ad metrics.
Ad Session is Ad Attempt to Ad End. Ad Actual Play Time is Ad Play to Ad End. Total Ad Duration is Ad Start to Ad End.
Reporting Ad Pod/Break Start and Ad Pod/Break End can provide additional insights about ad pods in the Conviva VSI Overview dashboard Improvement Opportunities data.
VST typically includes the time it took to buffer the main video before the pre-roll ads. Note that the pre-roll duration is not included in VST. However, in rare cases, if buffering exists after pre-roll, it will be included in VST.
EBVS - If user exits during the pre-roll ad, the content session will be marked as EBVS.
Server-Side Ad Insertion (SSAI)
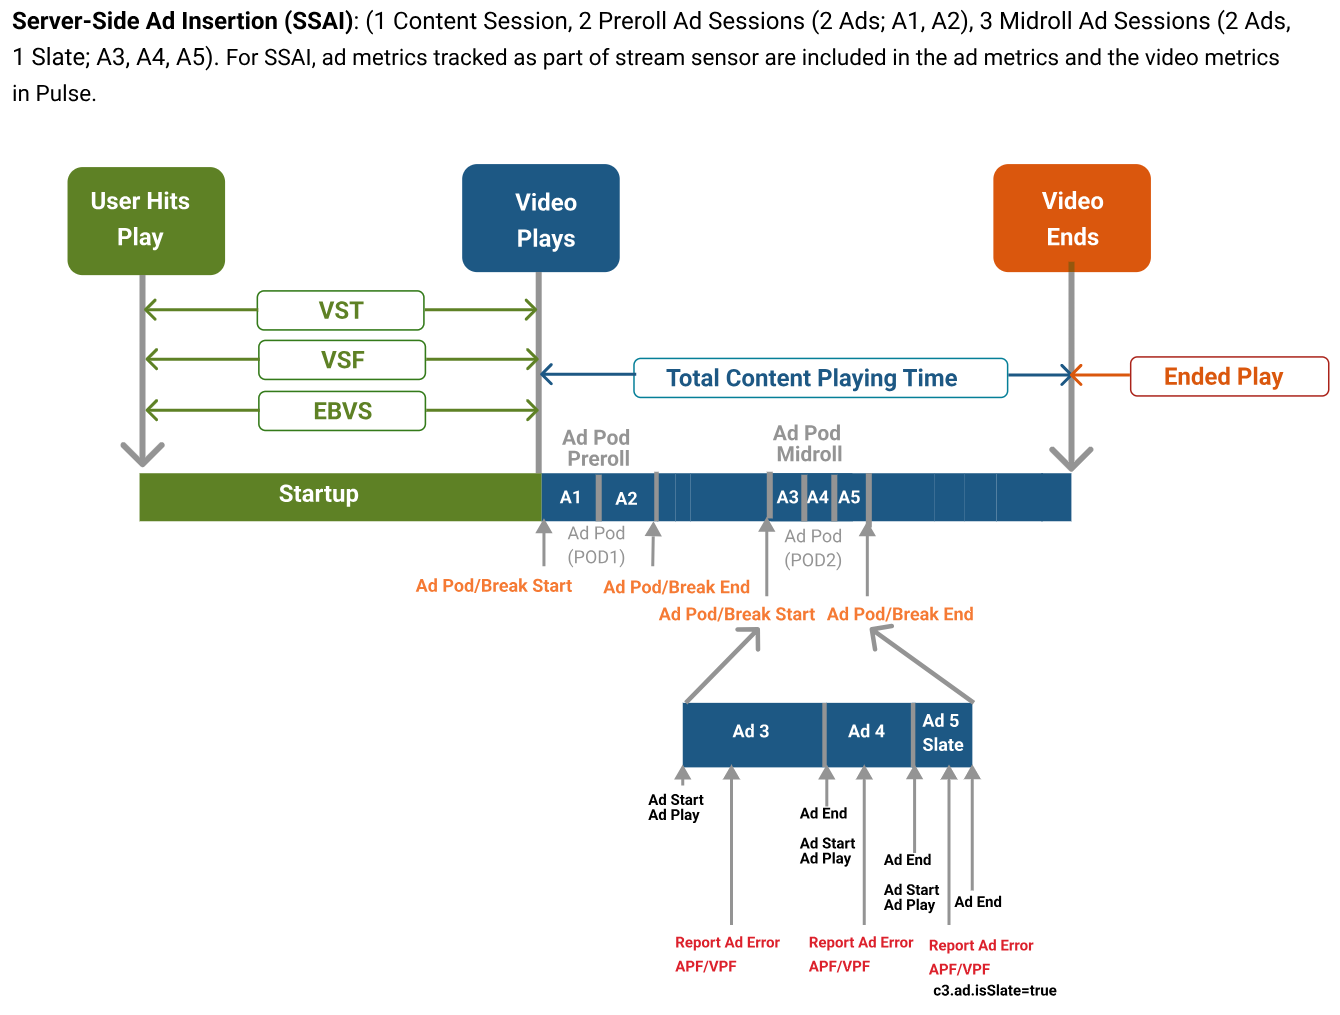
Stitched ad events are included in the video stream tracking.
Ad session is from Ad Start to Ad End.
Ad Actual Play Time is from Ad Play to Ad End.
For SSAI because AST is short, Ad Duration typically equals Ad Actual Play Time.
Ad errors are reported in both video sessions and Ad sessions.
Reporting Ad Pod/Break Start and Ad Pod/Break End can provide additional insights in the Conviva VSI Overview dashboard Improvement Opportunities data. Ad metrics are also tracked in Ads and reported in Pulse ad metrics.
See the Metric Dictionary for more details about the Conviva metrics.